
Emails can be added to the DMS using the Microsoft Office Outlook integration either manually or using a watched Outlook folder. However, there may be circumstances where email does not need to be handled by a person using a traditional email client and may never need human intervention. This sort of configuration can be handled simply using off-the-shelf tools in conjunction with FileHold.
One example of where it would be good to add email directly to the DMS is for invoice processing. Your vendors send your invoices to a special email address you provide them, such as . You would like each email to this address to be directly indexed using Click to Tag or Smart Soft Capture. Another scenario might be a standard PDF form that gets emailed to you for processing and storage. These scenarios are not exhaustive, but provide a good basis for similar solutions.
This example is provided to illustrate the sort of solutions that are possible using the document management system. Support for this example is not included in your FileCare subscription. Implementing this solution requires skilled IT personnel if you would like to set up a similar solution. The FileHold professional services team can also help with this sort of configuration.
Solution overview
Both scenarios below are implemented using free open source tools and tools included with Windows. The solution will work on a variety of operating systems, including Windows 11 and Windows Server 2022. The Internet Message Access Protocol (IMAP) has been used to access email as it is supported by common email servers and services. Windows Powershell version 5.1 drives the email attachment gathering. And MailKit is used to access the IMAP email server. The Windows Task Scheduler is used to execute the Powershell cmdlet at regular intervals.
This solution uses free or open source tools and includes links to external websites. FileHold does not make any representations about their fitness for this or any other use.
All the scenarios assume a document schema has been set up and a workflow template has been assigned to automatically start when the document is added. In each case, there should be an email that will receive the associated messages with attachments. Optionally, these emails can be exclusively available in a specific inbox folder. For example, invoices and other messages may go to a payables email address. When a user monitoring this address receives an invoice, they move it to the invoice sub-folder and then the Powershell cmdlet can process it.
Scenario 1 – PDF Forms Processing
For this scenario, the email sender has filled out a PDF form created by you, and you have created corresponding extraction rules. This could have been distributed to them using Courier, the anonymous portal, or a similar mechanism.

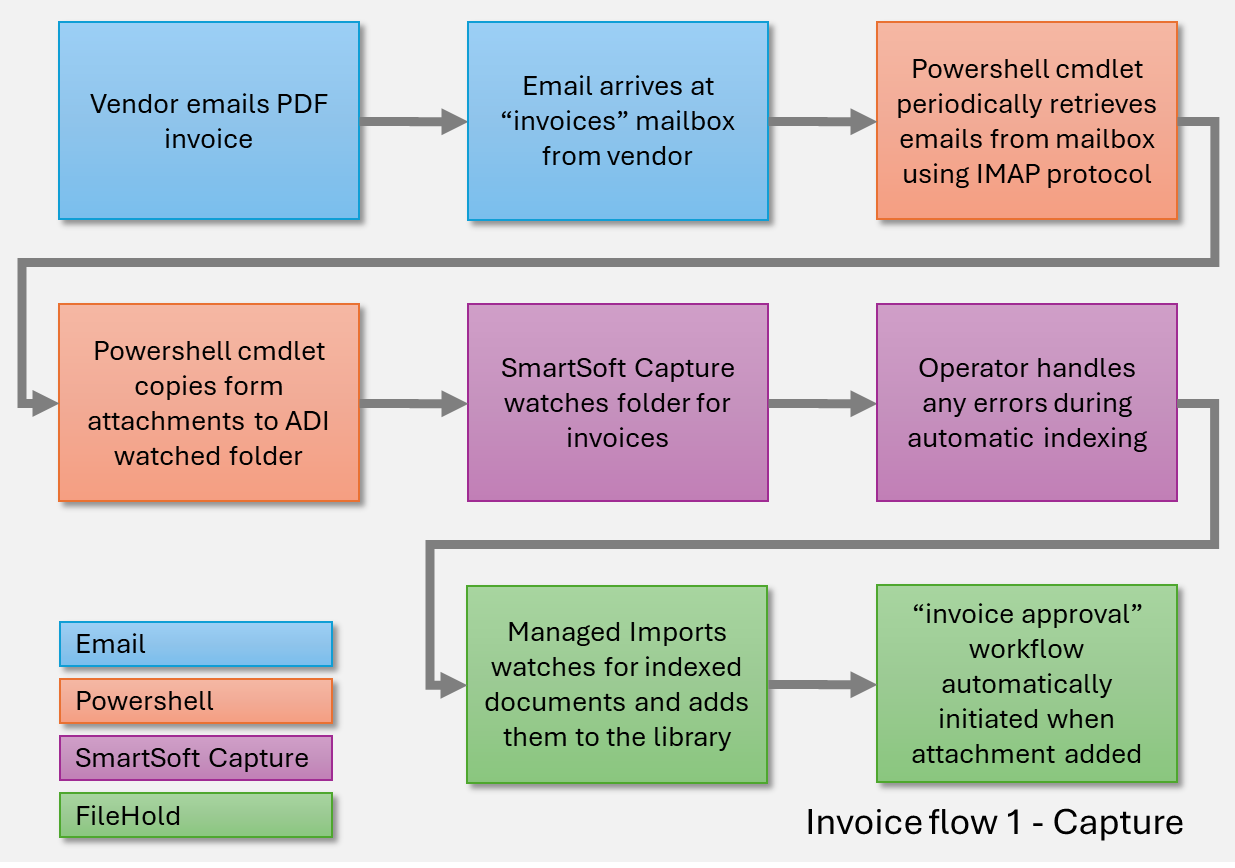
Scenario 2 – Invoice processing using Capture
In this second scenario, the email sender is sending a typical invoice for your accounts payable team to process. One of the team members has SmartSoft Capture set up on their workstation and the Powershell cmdlet is also running there.
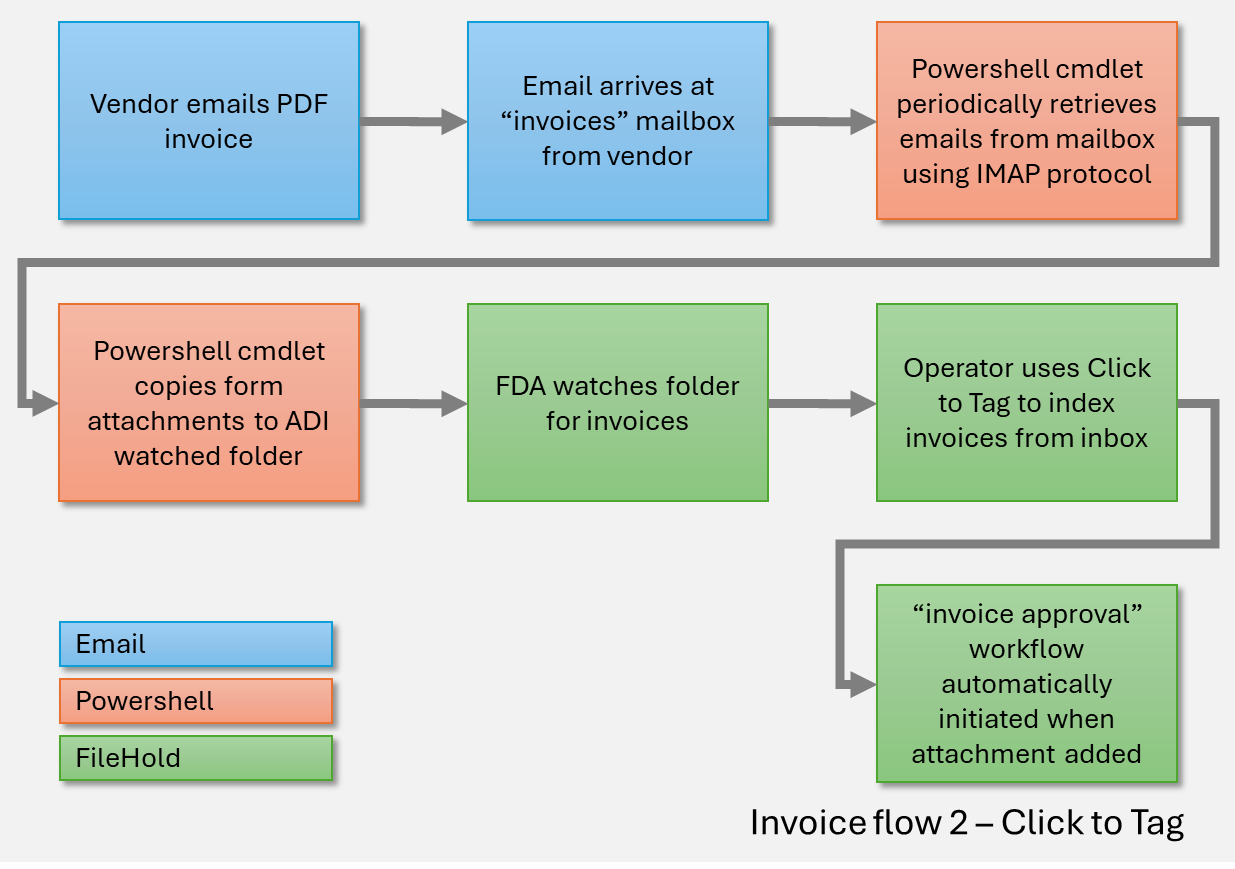
Scenario 3 – Invoice processing using Click to Tag
The final scenario is very similar to the last one. However, this time, when the account payables team member gets the invoice, they will use the Click to Tag feature of the FDA to process the invoices directly in their FDA inbox.
Creating the email client
We use Windows Powershell as it is readily available on all Windows machines, and it plays nicely with .NET components like MailKit. We assume you have downloaded MailKit using one of the many available methods. Update $mailKitDir to indicate where these files are stored. This example assumes basic authentication: username and password. Set the associated variables and the name of the email server. $saveDir is used to set the location where the attachments should be saved and $allowedExtensions lets you provide a list of extensions that you assume will be the files you want to store in FileHold.
The processing code is simple, first connecting to the email server, authenticating, opening the inbox, and setting up read-write access before starting the main processing loop. The loop looks for unread emails and then determines if they have an attachment in the specified list. If an email has an attachment, it is saved at the defined location, the email is marked as read, and processing moves to the next unread email. In the event an attachment name matches the name of a previously saved attachment, it is given a new name.
These Powershell examples use passwords and secrets in plain text. However, this is only meant to simplify the examples. When you are using production accounts, make sure to use only encrypted credentials locked to the machine they are running on. Many good tools are available to help with this, like Get-Credentials.
Authenticating with OAuth
Modern authentication with OAuth is a much safer method of authenticating an IMAP user. Email services like Microsoft 365 and Gmail do not allow the basic authentication method used above. The good news is that adding OAuth to this solution is simple. The first piece is getting the token, then simply switch out the password authenticate step with a token authenticate step. For the remainder of this example we will assume the popular Microsoft 365 email service.
You will get your tenant and client IDs from Azure. The client secret will come from the application you will define for this email client. After creating an application, say “IMAP email attachment reader”, in your tenant you can generate a secret. The remainder of the code is standard for all applications authenticating against Azure Entra.
Using a client secret is one method of getting an OAuth token. It may not be the best method as you must keep the secret very safe as anyone that can find it can exploit it. An alternate approach is to use a certificate. In this scenario you generate a certificate on your Windows machine and provide it to Azure Entra. The code is nearly the same. See the Microsoft article on how to make an access token request with a certificate. https://learn.microsoft.com/en-us/entra/identity-platform/v2-oauth2-client-creds-grant-flow#second-case-access-token-request-with-a-certificate
Once you have the $accessToken, you can replace the $imapClient.authenticate call from the basic authentication example above with the OAuth method. Make sure to update the $emailServer variable to “outlook.office.com”.
Setting up Azure Entra and Exchange Online for authenticating your email user
In some ways, configuring Microsoft 365 to allow you to authenticate is trickier than the Powershell code. There are a few steps you need to take assuming you already have a Microsoft 365 tenant with email configured. Microsoft provides good information about managing your application. https://learn.microsoft.com/en-us/azure/healthcare-apis/register-application
- Add an application registration for your new email client.
- Create a client secret for your application.
- Define the permissions necessary for the email client.
- Delegate authority to your email client application to use the intended email account.
Necessary permissions
You will need to define a couple of permissions to be able to access email in Office 365 Exchange Online: IMAP.AccessAsApp and Mail.Read. The portal will automatically add some permissions for Microsoft Graph. https://learn.microsoft.com/en-us/exchange/client-developer/legacy-protocols/how-to-authenticate-an-imap-pop-smtp-application-by-using-oauth
Delegating authority
The last step is to make the connection between your application registration and the email address that it will be reading. The link above provides some more details about the process, including installing the Powershell module for Exchange Online Management. There is a lot of information there, but some of it seems unnecessary for our case. You will need your service principal identity for your application. You can confirm with the following:
With that information, you can call Add-MailboxPermission for the email address that will be receiving the messages.
Setting up a Windows scheduled task
You will note that our Powershell script ends when all unread emails have been processed. Using a Windows scheduled task will allow this script to be run repeatedly at a frequency of our choosing. You can set up the task manually or use some Powershell like the following:
Setting up Automatic Document Importation (ADI)
ADI is also called server side import. It is an optional feature of FileHold that allows for unattended document imports to be setup and controlled. You can determine if this feature is enabled on your license information screen. You can add this feature at any time by contacting .
ADI is configured from the library administration menu. The following steps are necessary to import the forms emails.
- Create extraction rules to copy your form data to metadata fields.
- Add an ADI job to watch the folder where your attachments will be added.
Setting up SmartSoft Capture for indexing emails
Every FileHold installation comes with one concurrent license for Capture. The software can be installed on as many workstations as desired, but each users must have an available concurrent session to start Capture. More concurrent sessions can be added to your license at any time. This information also applies to Capture Plus.
- Make sure your FDA is logged in and start Capture.
- Go to the Tools > Settings menu to open the settings dialog.
- Select the General tab.
- Set the Watched Folder field to the folder where the email attachments will be stored.
- The normal set up procedures for Capture can be used at this point.
Setting up an FDA watched folder and indexing with Click to Tag
Every FDA has the watched folders and Click to Tag features. Optionally, FDA watched folders can also use extraction rules for those customers with an ADI license.
- Use Tools > Watched Folders… to select the watched folders list and add a new watched folder.
- When you are asked to browse for the folder, select the folder where the email attachments will be stored.
- The normal set up procedures for watched folders can be used at this point, but do NOT set the checkbox for automatically sending files to the library.
- Now, as email attachments get downloaded, the FDA will add these attachments to the inbox. Follow the normal procedures for using Click to Tag to index the documents.