
FileHold document management system includes a powerful feature called Managed Imports, which will import documents along with metadata. The process is driven by an XML file that specifies the location of the document and its associated metadata. See the format of the XML file here.
With this basic knowledge it is possible to exploit the power of a feature of Microsoft Office applications called Visual Basic for Applications (VBA). An appropriately skilled person can create programs directly inside of Microsoft Office applications such as Excel. This method can be used to create the XML file needed by Managed Imports.
FileHold supports extracting metadata directly from the Microsoft Word content controls in e-forms. This method has the advantage that the data is incorporated directly in the document and does not require a separate XML file. It has the disadvantage that it can only be used with Microsoft Word. By using VBA, any Microsoft Office application could be enabled for automatic metadata entry into the document management system. Some of the possible applications include Word, Excel, Power Point, Visio, Outlook, and Project.
An example where this could be used might be a travel expense processing system. Employees could fill out expense reports in an Excel spreadsheet. When they are finished they could press a “Submit” button on the form. Behind the scenes a custom VBA program could create the XML file and save both it and the document in a special network folder that a managed imports client is watching for new files. When managed import sees the new file it automatically loads it into the document management system where an expense processing employee would be alerted to begin working with the expense report.
This article assumes the reader is skilled with topics like Excel and VBA. If you need help integrating something like this for your specific use case contact our professional services team at .
Preparing for importing metadata
To illustrate this further we have included an expense processing example. There are three components to setting up the transfer of metadata from an office document to the document management system.
The source document. In this case we have taken an example from Microsoft. It is available from their library of sample documents.
The VBA program. This is in two parts. In this example we will create the XML file in the same place the Excel file is stored. The names will be the same except for the extension. The XML file will be created automatically when the Excel document is saved, so we need a small piece of code in the workbook. The main code for creating the XML file is in a module. Download the sample of the expense report with the VBA code.
A managed imports configuration. Setting up managed imports is fairly easy. The most important part is to map the metadata in the XML file to metadata defined in the document management system.
Modifying the expense report example
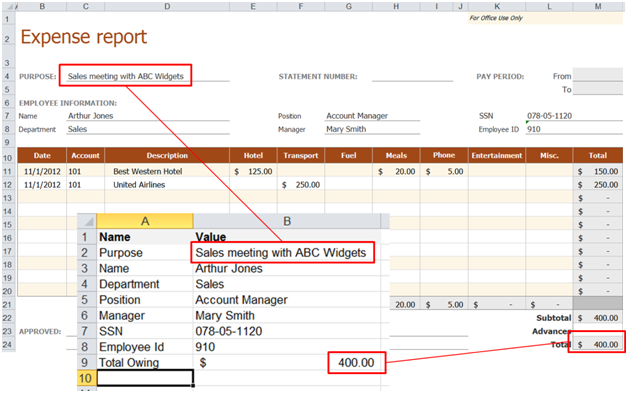
On its own the expense report provides a nicely formatted sheet. We need to add two things to complete our example: a metadata sheet and the VBA code. The purpose of the metadata sheet is to make the VBA code more universal. It creates a copy of the values we want for metadata from the nicely formatted sheet into a simple tabular form. The tabular metadata sheet is named “Metadata”. The values are copied using a simple formula such as “=’Expense report’!C4”.
The image below illustrates the two sheets and some of the connected metadata.
Adding the VBA code
The following code hooks the workbook event AfterSave, so it should be added to the workbook.
	Private Sub Workbook_AfterSave(ByVal Success As Boolean)
	'* Create the sidecar XML file after the main Excel has been saved
	    MsgBox ("About to generate XML file for managed imports: " + GetThisWorkbookBaseNameAndPath() + ".xml")
	    Call GenerateFileHoldXMLFile(GetThisWorkbookBaseNameAndPath() + ".xml", Worksheets("Metadata"))
	End Sub
The next bit of code does all the heavy lifting. It looks to the “Metadata” sheet to find the names and values. It then copies those in the correct format to the XML file. This code should be added to a module.
Public Const METADATA_START_ROW = 2
Public Const METADATA_NAME_COLUMN = 1
Public Const METADATA_VALUE_COLUMN = 2
Function GetThisWorkbookBaseNameAndPath() As String
'* Return the path and base filename for the workbook.
Dim sArray() As String
sArray = Split(ThisWorkbook.FullName, ".")
'* Assume the last period is the file extension
GetThisWorkbookBaseNameAndPath = sArray(0)
For i = 1 To UBound(sArray) - 1
GetThisWorkbookBaseNameAndPath = GetThisWorkbookBaseNameAndPath + "." + sArray(i)
Next i
End Function
Sub GenerateFileHoldXMLFile(FileName As String, WS As Worksheet)
'*
'* Example:
'* Generate an XML file for using with FileHold
'* Copyright © FileHold Systems Inc.
'*
'* Important:
'* This example is free to use by our customers and is provided AS-IS with no warranty expressed or implied.
'*
'* Usage:
'* The code assumes your metdata is stored with name and value in the same row in a user supplied sheet.
'* Change the contstants to define the first row with metadata and the columns used for names and columns.
'* The code will finish when an empty row is detected. If an empty value is found, no metadata will be written to
'* the XML file, but the processing will continue.
'*
'* Parameters:
'* Filename - name for the XML code
'* WS - worksheet object where the metadata can be found
'*
Dim F As Integer
F = FreeFile
Open FileName For Output As #F
Print #F, "<?xml version=" + Chr(34) + "1.0" + Chr(34) + " encoding=" + Chr(34) + "UTF-8" + Chr(34) + "?>"
Call EmitRoot(F, WS)
Close #F
End Sub
Sub EmitRoot(F As Integer, WS As Worksheet)
'* This is the main logic for outputing the metadata
Dim MetadataName As String
Dim MetadataValue As String
Dim Row As Integer
Print #F, "<Batch>"
Print #F, " <Page>"
Call EmitField(F, "File Name", ThisWorkbook.Name)
Row = METADATA_START_ROW
MetadataName = WS.Cells(Row, METADATA_NAME_COLUMN)
Do While (MetadataName <> "")
MetadataValue = WS.Cells(Row, METADATA_VALUE_COLUMN)
If (MetadataValue <> "") Then
Call EmitField(F, MetadataName, MetadataValue)
End If
Row = Row + 1
MetadataName = WS.Cells(Row, METADATA_NAME_COLUMN)
Loop
Print #F, " </Page>"
Print #F, "</Batch>"
End Sub
Sub EmitField(F As Integer, Name As String, Value As String)
'* Output a single field to the XML file
Print #F, " <Field>"
Print #F, " <Name>" + Name + "</Name>"
Print #F, " <Value>" + Value + "</Value>"
Print #F, " </Field>"
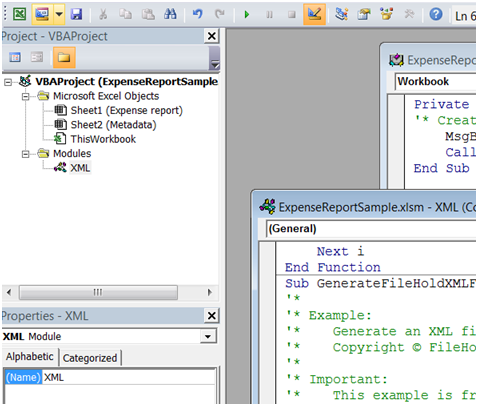
End SubThe final project should look like the screen shot below.
When you save the Excel file you will find an XML file created with the same name.
	<Batch>
	   <Page>
	      <Field>
	          <Name>File Name</Name>
	          <Value>ExpenseReportSample.xlsm</Value>
	      </Field>
	      <Field>
	          <Name>Name</Name>
	          <Value>Value</Value>
	      </Field>
	      <Field>
	          <Name>Purpose</Name>
	          <Value>Sales meeting with ABC Widgets</Value>
	      </Field>
	      <Field>
	          <Name>Name</Name>
	          <Value>Arthur Jones</Value>
	      </Field>
	      <Field>
	          <Name>Department</Name>
	          <Value>Sales</Value>
	      </Field>
	      <Field>
	          <Name>Position</Name>
	          <Value>Account Manager</Value>
	      </Field>
	      <Field>
	          <Name>Manager</Name>
	          <Value>Mary Smith</Value>
	      </Field>
	      <Field>
	          <Name>SSN</Name>
	          <Value>078-05-1120</Value>
	      </Field>
	      <Field>
	          <Name>Employee Id</Name>
	          <Value>910</Value>
	      </Field>
	      <Field>
	          <Name>Total Owing</Name>
	          <Value>400</Value>
	      </Field>
	   </Page>
	</Batch>
Setting up manage imports
The General tab of managed imports defines where the files will come from. We are setting managed imports to watch the folder. When anything is added to the folder, it will be automatically added to the document management system Inbox.
Be sure to have your import type set to “Dynamic import / Classic FileHold XML” or “Both” in the User Preferences.

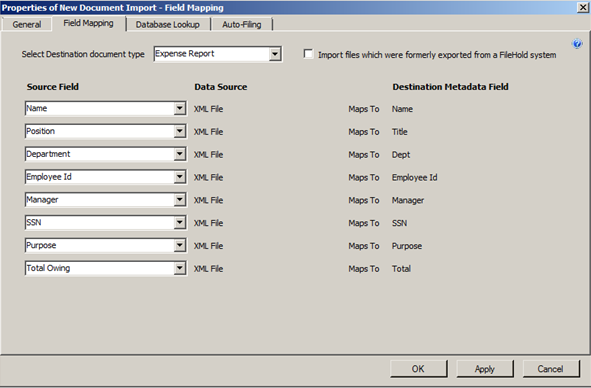
The only other mandatory settings are in the Field Mapping tab. Here we map the metadata values in the XML file to the metadata that has been defined for the Expense Report schema.
With this configuration in place files will be automatically imported with all metadata prefilled. The only thing that remains is to select a destination in the library. A further enhancement can be made in the VBA code to specify the library location to work with Auto-Filing if this location can be known in advance.

Sample expense report
Download a copy of the sample expense report that was used in this example with the macro enabled.