The document management system includes a powerful feature called Managed Imports, which will import documents along with metadata. The process is driven by an XML file that specifies the location of the document and its associated metadata. See the format of the XML file here.
With this basic knowledge it is possible to exploit Microsoft Excel to help import large numbers of documents and their metadata from a variety of sources. Microsoft Excel is a good tool as it makes it easy to find errors before the import. It is also possible to manipulate information from the documents current location as metadata in the new document repository. The XML file can be easily created using Visual Basic for Applications (VBA) that is included with Excel.
The following example highlights one specific import scenario, but many variations are possible with the same technology. A VBA program is included below that can be used with your own data for producing a correctly formatted XML file.
Overview of the document migration process
There are a number of steps needed for successful migration. Some of these require FileHold and some can be performed using many tools, including Excel.

Sources of the document information
There are two sources of information needed to prepare for the import of documents.
- The documents are stored in a shared folder. The folder names provide information about the type of documents as well as a customer name.
- General customer information is stored in an Excel spreadsheet.
Getting the document information
As you can see in the following screen shot, the documents are contained in a folder on the E drive called Shared. There are three folders one level down for each of the types of documents: Contract, Credit Application, and Settlement. Within those folders is a folder for each customer containing their documents.

In order to use this information we must extract it into an Excel spreadsheet. Excel can open a text file, so we will use the Windows dir command to create one containing all the files and the full folder path to each file.
You can also use an alternate method using Powershell.
This command will produce a new file called filelist.txt.

If we open this file with Excel we will get prompted by the text import wizard. This text file is very simple and we can simply choose the fixed width option and press finish to continue.

The text import will automatically add a row to the Excel worksheet for each document.

We can copy these rows to a new sheet in the workbook with the macro for creating the XML file. The workbook with the macro is included with this example. A new tab called RawFiles was created and the list of documents was pasted into the first column. The first row was reserved as a header to help identify the contents of the column. Three additional columns have been created using simple Excel formulas to locate the beginning of the document type, the customer name, and the filename. We will use this information in Excel formulas that will extract metadata from the folder names.

The general customer information has been copied from another spreadsheet onto a new tab called CustomerInfo in the same workbook.

Preparing the information
We now have all the raw information needed to create our new file list that will be the basis for creating the XML file. We will create this list in a tab called FileList which will consolidate the information from RawFiles and CustomerInfo.

This is the workbook tab that the macro will use to create the XML file. Its format is very specific. The first row must contain the metadata names for the information underneath. This is the exact information that will appear with the name tag in the XML file, so make sure it matches what you need for the import. The name File Name is reserved and required. The names DocumentSchema and LibraryPath are also reserved, but optional. The remaining names, Customer Name, Phone No, Renewal Date, and Destroy Date are user defined for this example.
The File Name, DocumentSchema, and Customer Name have been created by dissecting the full path and filename that was created by our earlier dir command using Excel formulas. The Phone No, Renewal Date, and Destroy Date have been found by looking up the data from the CustomerInfo tab based on the customer name using the Excel VLOOKUP function. The LibraryPath is the same for each document. This cabinet, drawer, and folder already exist in the library.
When the file data is complete and ready for import, all that remains is to set the parameters and run the macro. The Parameters tab contains the list of parameters along with a button that will conveniently run the script.

There are eight parameters that can be set for the macro.
| XML Filename | This is the name of the XML file that will be generated by the tool. |
| Metadata Header Row | The row number, on the file list, that contains the names for the XML tags. |
| Metadata Start Row | The first row of metadata to process. |
| Maximum Rows | The total number of rows that should be processed. It is useful to keep this number small, 5000 or less, to simplify data transfer and verification. |
| Metadata First Column | The column number, on the file list, with the first set of metadata. |
| Metadata Columns | The number of columns that contain metadata. |
| Date Mask | This is the format that will be used whenever an Excel date formatted column is written to the XML file. It should only be necessary to change this if you need to include the time and or time zone. The format mask must be supported by both Excel and FileHold. If you need more than one date format you can clear the date mask field and the macro will use the text exactly as seen in the worksheet. This means you can select any format for any column, but it also means that if the column is too narrow and what you see in the column is #######, this is exactly what will appear in the XML file. |
Creating the XML file
Most of the hard work is now complete. We can execute the macro from the Excel macro menu or by pressing the button on the Parameters sheet. Before the file is created, a dialog will appear and give us a chance to confirm that we would like the process to begin. It will display a list of the metadata fields that will be added to the XML file. If we press cancel the macro will immediately exit.

The number of documents that were added to the XML file will be displayed when the macro completes. The resulting XML file can be viewed with Microsoft Internet Explorer or other tools.

Setting up manage imports
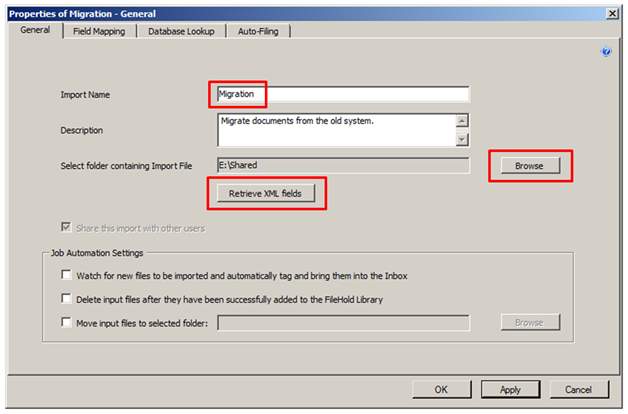
The Desktop Application (FDA) is used to import documents. First a connection needs to be made between the XML script file and the document management system. Add a new import with Tools > Manage Imports and set the parameters shown. The import name is mandatory. Browse for the XML script file and press Retrieve XML fields to analyze the metadata.
The XML script file(s) must be located in the same directory tree as the documents that will be imported. You must have correctly configured the metadata and document schema (type) to match the data that will be imported.

Our Excel macro creates an XML document that mimics the FileHold XML format. This means we can import more than one document schema at one time and we do not need to manually map metadata names.

Since we are using the FileHold XML format, the library destination is included in the XML file. As a result, we can send the files directly to the library. If the library destination is not correctly formatted in the XML file, the documents will be left in the inbox regardless of the automatic send setting. For FileHold 12 or lower the library location must exist before the documents are imported.
If the library location does not exist in these versions it can only be created using an auto-filing script. This method is not described in this article.

Select the import configuration and press the Start button to begin the import process. This phase of the import will be relatively short as the documents are only queued up for importing at this stage. Press the Show Log File button to see that the documents have been correctly queued for import. The total number of files should match the number reported by the Excel macro.

If the documents had the correct destination set, the transfer process will begin. The progress can be reviewed by displaying the View > All Files in Transfer screen. The length of time needed to transfer all the documents will depend on the performance of the workstation, server, network, and the size of the documents. If the transfer is interrupted for any reason it will automatically restart when the user logs back into FileHold FDA.
If there were any errors or mismatches between the FileHold configuration and the XML file the documents will be placed in the inbox until the errors can be repaired. It is best to import a very small number of documents to test the configuration and process before importing all the documents.

Verifying the import
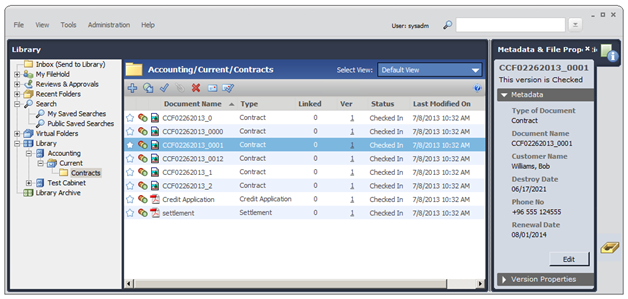
Once all documents have successfully been added to the document repository you can verify that the process has worked correctly. There are multiple techniques that can be used depending on how you are operating the system. The first is a direct inspection of the documents to verify the metadata has correctly been updated.

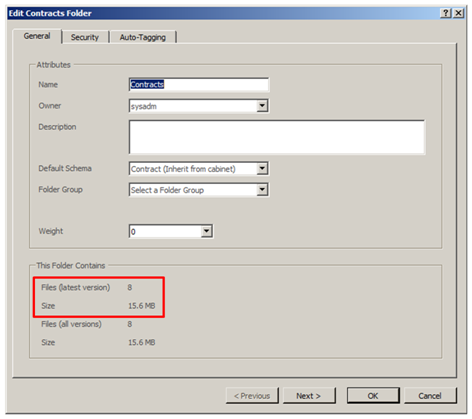
The next is method is to check the size of the library before and after the import. The difference between the two values can be compared to the number of documents that were imported. This information is available in the cabinet, drawer, folder group, or folder properties.

If there are other users adding documents to the repository at the same library location(s) as the import, it may be necessary use other methods to verify the import. A search for all documents created on the import date(s) by the import user will do the trick.
The total number of documents that can be returned by a search is limited by the system configuration. For example, if 10000 documents were imported and searches are configured to return no more than 5000 documents the search will not find all documents that were imported.

A simple spreadsheet could be maintained to keep a log of the import process and verification. This is optional, but could very helpful to prevent mistakes.

Importing documents before the system goes live
The preceding example has assumed that no documents are being added to the shared folder after the import process starts. This is common when users start using the new document management system before the migration takes place. However, there are some scenarios where the old system will continue to be used until all documents have been migrated to the new document management system. This can offer a complication when there are a large number of documents to migrate and it will take multiple days to add them to the new document management system.
In this case, the techniques described here are still useful, with minor modifications. The migration will be broken into two or more phases. In each phase a portion of documents will be added to the new document management system. Once most documents have been added there will be a final “delta” phase containing only the new documents added since the last file list was taken. During the delta phase, no new documents should be added to the old repository.
The following command will list files with the creation date and time though no longer with the bare formatting.
dir /tc /a-d /sAn alternate with Powershell.
The bare format can be retained, but some manual effort will be needed to find the last file imported in a prior phase using the date ordered switch.
dir /tc /a-d /s /b /odAn alternate with Powershell.
It is possible to custom build a dir command using forfiles. The following command will show all files modified on or after July 7, 2013.
forfiles /d 7/7/2013 /s /c “cmd /c if @isdir==FALSE echo @path”An alternate with Powershell.
None of these techniques should be used if it is possible that documents that have been added to the new document management system may have been modified since the import. The FileHold professional services team can assist with more complex import situations such as this.
Macro-enabled spreadsheet sample
Download a copy of the maco-enabled spreadsheet.
The Excel VBA program included here is provided as an example only. We are unable to support it under FileCare. We recommend you consult a qualified resource in the event you would like to use this VBA code in your environment.
