This article describes how to set up the document management software and Kofax Capture using a release script.
This release script is an MSI package and is for Windows XP Pro only. If you are attempting to install this on Windows Vista or Windows 7, you will need to research how to use an MSI package on these operating systems.
This add-on to FileHold document management software is provided at no charge but it is not covered or warrantied under the FileCare support program. Some documentation is provided that may be of assistance to knowledgeable IT people in implementing this add-on or modification but if technical assistance from FileHold is required, it will be provided at our current hourly billing rate. For information on how to buy additional support hours contact .
Installing the FileHold release script
- Download this file https://downloads.filehold.com/DEMO/Kofax/Kofax_Release_Sept_28_07.zip.
- Unzip the and run the FHXMLRelSetup.msi file.
- The FileHold Release Script for XML Setup Wizard opens. Click Next.
- Select the Installation folder. The default is C:Program Files (x86)FileHold Release Script for XML.
- Select if the release script is available only to you or anyone who uses the computer. Click Next.
- At the Confirm Installation screen, click Next to start the installation.
- The FileHold release script will install. Click Close when the installation is complete.
Testing for document import with the Kofax Capture release script
- Log in to the Web Client as a Library Administrator and create the following metadata fields:
- Document Name of type Text
- Invoice number of type Number.
- Create a document schema named Invoice. Add all FileHold groups as members and assign created metadata fields to schema. Leave default values for remaining options of document schema.
- Use the FileHold Desktop Application (FDA) or WebClient to create a cabinet called Invoice_Test with default schema Invoice to the library.
- Create a drawer called Invoice_Test_Drawer for the Invoice_Test cabinet.
- Create a folder called Invoice_Test_Folder in the Invoice_Test_Drawer. The folder should also have Invoice as a default document schema.
- In Kofax Capture, create a new batch and scan the sample documents.
- Use the Index Setup menu to add new index field Invoice number.
- Start Indexing for each document enter values for indexes: Document Name and Invoice number.
- Select FileHold from Job Setup > Export menu. Select a destination directory and the PDF file type.
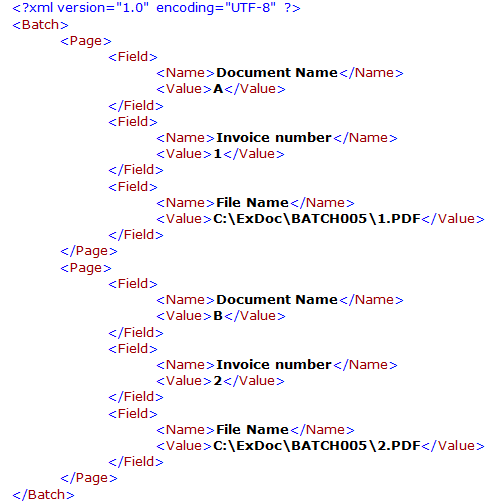
- Click Export Batch. The destination directory will contain a <batch_name>.xml file and a directory with the same name containing exported documents. The following is a sample xml file:

- After successful document export with Kofax, the FileHold document import can be executed with the Manage Imports tool. Make sure that FileHold is configured as described above.
- Login to FDA and go to Tools > Manage Imports.
- In the General tab, do the following:
- Enter an import name.
- Select the folder containing documents exported from Kofax and click Retrieve XML fields.
- In the Field Mapping tab, select destination document type Invoice and then map all indexes to appropriate metadata fields. Click OK.
- In the List of Document Imports window, select created the import and click Start.
- Go to the Inbox (Send to Library) to view the imported documents.
- Select an imported document and click Edit Metadata to check metadata values.
- Select a document and click Edit destination and choose the Invoice_Test_Folder folder.
- Click Send All to finish the import process.
