
Metadata fields represent the information about a file that users think of when identifying a particular document, like the file name, the customer name, and unique identifiers such as invoice or purchase numbers or specialized codes. These bits of information, if captured, make finding the file simple and easy – even in a database of millions of files.
When adding a file to the document management system the user will select the schema they want to associate with the document by using the Document type pick list from the add document form. The schema that is selected will determine what metadata is required and the format that the metadata will take.

Metadata fields are created by the Library Administrator based on the needs and preferences of the organization. Metadata fields can be used in multiple schemas.
To create metadata fields
-
In the Web Client, go to Administration Panel > Library Configuration > Metadata Fields, and click New Metadata Field.
-
Alternatively, in FDA, go to Administration > Manage Schemas > Metadata Fields and click Add Metadata Field (+ sign).
-
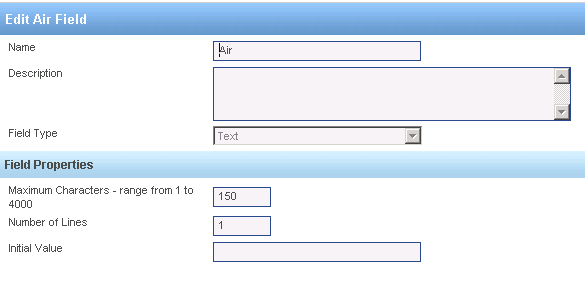
In the Add Metadata Field pane, enter a Name for the metadata.
-
Enter a Description for the metadata. The description will display as a tool tip in the metadata pane. This is useful for informing users what needs to be entered into the field. This is limited to 250 characters.
-
Select a Field Type. Refer to the following table for more information on how to enter the field properties.
Once a metadata field has been created and saved, the field type (text, numeric, date, and so on) cannot be modified. This is one of the few things that cannot be changed in FileHold.
You cannot have duplicate metadata field names in FileHold. Simply rename the obsolete metadata field and create a new one. If the obsolete metadata field has no further value in the system, delete it.
| Field Type | Description |
|---|---|
| Text |
Set up a text box that ranges from 1 to 4000 characters*. 1. Enter a minimum number of characters. |
| Drill Drop Down Menu |
For more information, see Creating Drill-Down Metadata Fields. |
| Drop Down Menu – FileHold Managed |
For more information, see Creating FileHold Managed Drop-Down Metadata Fields. |
| Drop Down Menu –Database Lookup |
Set up option items to come from an external database. For more information, see Creating Database Managed Drop-Down Metadata Fields. |
| Date |
Configure a date field for the metadata properties. 1. Select the Date Display Format.
|
| Number |
Set up a numeric field for the metadata properties. 1. Enter the number of Decimal Places. |
| Currency |
Set up a currency field for the metadata properties. 1. Enter the number of Decimal Places.
|
| Check Box |
Set a check box field for the metadata properties. 1. Select on option for the check box: |
| URL |
Set a URL field for the metadata properties. Users viewing the metadata will be able to click this link to open a browser windows and go to the referenced page. 1. Enter a URL link, if applicable. The protocol must be included. For example, http://www.urlname.com 2. Enter the link Caption, if applicable. |
There are a few character sequences that should not be used in values for metadata fields: <a through <z, <!, <?, </, and &#. This applies to text, dropdown, drill down, and URL fields. In some cases FileHold will prevent the user from entering these values, but this is not always possible with database dropdown or database lookup fields. They could be accidentally interpreted as HTML sequences in the web client.

- Click Save. Once you have created all your metadata fields, you can add them to your schema.
Adding metadata fields to a schema
Once you have your metadata fields created, you can then add them to the schema in order to collect the high level information about the document and search for the specific values.
A good rule of thumb is that users will be able and willing to fill out 3-6 metadata fields per schema with at least 50% of them set to “Required”. If metadata fields are not flagged as required in the schema, then users can add documents to the system without entering any tagging information. Then when you go to do a search, the document may not be found or may have less relevance in the search results. If you need a lot of non-required fields to be filled out, it is best if they can be linked to an external data source and filled out using a lookup. This way users can press a single key or click a single button to fill out all the fields.
To add metadata fields to the schema
-
In the Available Metadata Fields list, select the field names that belong to this schema and click Add to Schema.
-
In the Metadata Fields Used by This Schema area, do the following:
-
Visible is enabled by default, so the box is checked when you first add a field. Clearing the Visible flag is similar to deleting the field from the schema except you will not loose any data. If a field is not visible, it will not be available in the metadata pane, you will not be able to select it as a search criteria for this schema, you will not be able to import data using managed imports, or use metadata extraction rules to populate it. If you make a change to field visibility, you will need to rebuild the full text search index before it is reflected correctly in a CONTAINS FTS search.
-
If the field is required to be filled out by the user, select the Required check box. If the field is optional, clear the check box.
- To have the value in the field cleared upon check in, select the Clear at Check In check box. This is useful when metadata fields such as “Comments” or “Status” needs to be changed for each version.
-
If the field should not be editable by a normal user, select the Read Only check box. Metadata fields are made read only after they are associated with a document schema. This means you can use the same metadata field on two schemas, one where it is read only and one where it is read write. There can be an exception to the restriction for normal users to edit a read only field. See the permission setting “Allow the creator of a document to modify the initial value of read-only fields”.
Administrators can always edit read only fields. See User Roles and Accessing the Library for how to make a user an administrator.
-
To set the order of the fields in the Metadata panel, select the order number from the list. For example, if you want the Name field to be first in the list, set this to order number 1. If you want the comments field to be last in the list, set this to the last available number in the list.
-
To remove the metadata, click the X.

-
Click Next in the Document Schema Wizard to configure Workflow.
Editing a metadata field
Once a metadata field has been created and saved, the field type cannot be modified. This is one of the few things that cannot be changed in FileHold.
You cannot have duplicate metadata field names in FileHold. Simply rename the obsolete metadata field and create a new one. If the obsolete metadata field has no further value in the system, delete it.
Metadata field values are stored as plain text in the full text index. Any change, no matter how small, to a metadata field value that is used on a document will cause that document to be re-indexed. A single change to a metadata field could cause many documents to be reindexed where that metadata field or value is associated many documents. Single changes that could cause many documents to be re-indexed include adding, editing or deleting a drop down or drill down metadata field value or deleting a metadata field from a document schema. If you have a large number of documents using this metadata field, then this could take time to complete and consume significant system resources during the re-indexing process. Plan changes like this to happen outside of normal operating hours if possible. You can make metadata fields invisible on a document schema to avoid the re-indexing while removing the field from users’ view. If the user performs one of these actions, a message “You are about to make a change that will cause x documents to be re-indexed. While these documents are being re-indexed, users may notice decreased performance in the system.” This message appears when at least 1000 documents are affected. This setting can be controlled by the setting “ReindexWarningThreshold” in the web.config file in C:Program FilesFileHold SystemsApplication ServerLibraryManager.
To edit a metadata field
-
In Web Client, go to Administration Panel > Library Configuration > Metadata Fields.
-
Alternatively, in FDA, go to Administration > Manage Schemas > Metadata Fields
-
Double click on the metadata field name to edit.
-
Click Edit Field.
-
Make any changes to the metadata field. To update a dropdown list or drill down menu, click Manage Menu Items.
-
Click Save when finished.
Deleting metadata fields
Deleting a metadata field is permanent and complete. All current and historical values for the metadata field will also be erased. The user will receive this warning immediately prior to deleting a metadata field that has values associated with it.
To delete a metadata field
-
In Web Client, go to Administration Panel > Library Configuration > Metadata Fields.
- Alternatively, in FDA, go to Administration > Manage Schemas > Metadata Fields
- Double click on the metadata field name to edit.
- Click Edit Field (Web Client only).
- Click Delete.
- At the warning message prompt, click OK. The metadata field is deleted from all associated schemas along with any values that existed prior to the deletion.